Adding Texture to Air Dry Clay: Stamps, Leaves and Fabric
Press lace, leaves and household objects into soft air dry clay for pattern, carve lines once it firms up, and use a paint wash to make the texture show.

Tutorial at a glance
Materials
- Air dry clay (about a tennis-ball-sized lump for a practice slab)
- Roller and non-stick work surface
- Lace or textured fabric
- Fresh leaves with strong veins
- Fork, bottle caps, pen caps and buttons
- Toothpick or needle tool
- Cornstarch and a soft brush
- Cutters or a craft knife
Soft air dry clay records whatever touches it: the weave of a napkin, the veins of a leaf, the ridges on a bottle cap. That makes texture one of the simplest ways to lift a plain slab, and most of the tools are already in a kitchen drawer or the garden.
What You Need
- Air dry clay and a roller
- A non-stick work surface such as parchment, canvas or a silicone mat
- Lace, a doily, burlap or another fabric with a raised pattern
- Fresh leaves with strong veins
- Small household objects to use as stamps: a fork, bottle caps, pen caps, buttons
- A toothpick or needle tool for carving lines
- Cornstarch and a soft, dry brush for dusting
- Cutters or a craft knife for cutting the textured slab
Keep the objects you press into clay as craft tools from then on, and do not return them to kitchen use. Sharp tools need adult supervision, and small parts such as buttons and bottle caps should be kept away from young children.
Texture Before Cutting or After?
For all-over patterns, texture the slab first and cut your shapes second. Pressing a pattern into clay spreads it slightly, so a shape that was cut first ends up stretched and its edges go wavy. Texturing first also means the pattern runs cleanly off every edge.
Texture after cutting when you want a single placed mark, such as one stamp in the middle of a tag or a border of dots that follows the outline. Press gently and support the piece on a flat surface so it keeps its shape.
| Approach | Best for | Keep in mind |
|---|---|---|
| Texture, then cut | Lace, fabric, leaves, all-over stamped fields | Roll the slab slightly thicker, since pressing thins it |
| Cut, then texture | Single stamps, borders, initials, centered motifs | Light pressure only, or the outline distorts |
| Carve when firm | Fine lines, hatching, drawn details | Wait until the clay holds its shape but is still slightly damp |
If you need a refresher on getting the slab even to begin with, see the tutorial on how to roll air dry clay.
Pressing Lace or Fabric with the Roller

- Roll the slab. Aim for a little over 1/4 inch (6 mm), slightly thicker than your final piece.
- Lay the fabric flat. Place the lace or fabric on the clay without stretching it and smooth out any folds.
- Roll once, firmly. Push the roller over the fabric in a single steady pass with even pressure. Going back and forth tends to shift the fabric and blur the pattern into a double image.
- Peel slowly. Lift one corner and peel the fabric back low and parallel to the slab.
- Cut your shapes. Press cutters straight down or cut around a template, as described in the guide to cutting air dry clay cleanly.
Chunky textures such as crochet lace, burlap and thick knits leave deeper, clearer marks than fine fabrics. Synthetic lace usually releases more easily than fluffy cotton, which can leave fibers behind.
Leaf and Plant Impressions
Leaves give some of the most detailed impressions you can get. Choose fresh, flexible leaves with raised veins on the back; dry leaves crumble into the clay. Lay the leaf vein side down, roll over it once with firm pressure, then lift it by the stem. Small sprigs, fern tips and grass seed heads work the same way.
Use plants you can identify, avoid any with thorns, sap or irritating hairs, and rinse and pat leaves dry before use so no soil is pressed into the slab. A full project built on this technique is the leaf dish with a real leaf imprint.
Improvised Stamps from Around the House
Anything with a firm, interesting end or edge can be a stamp. Test each object on a scrap of clay first to see the mark it makes and how hard to press.
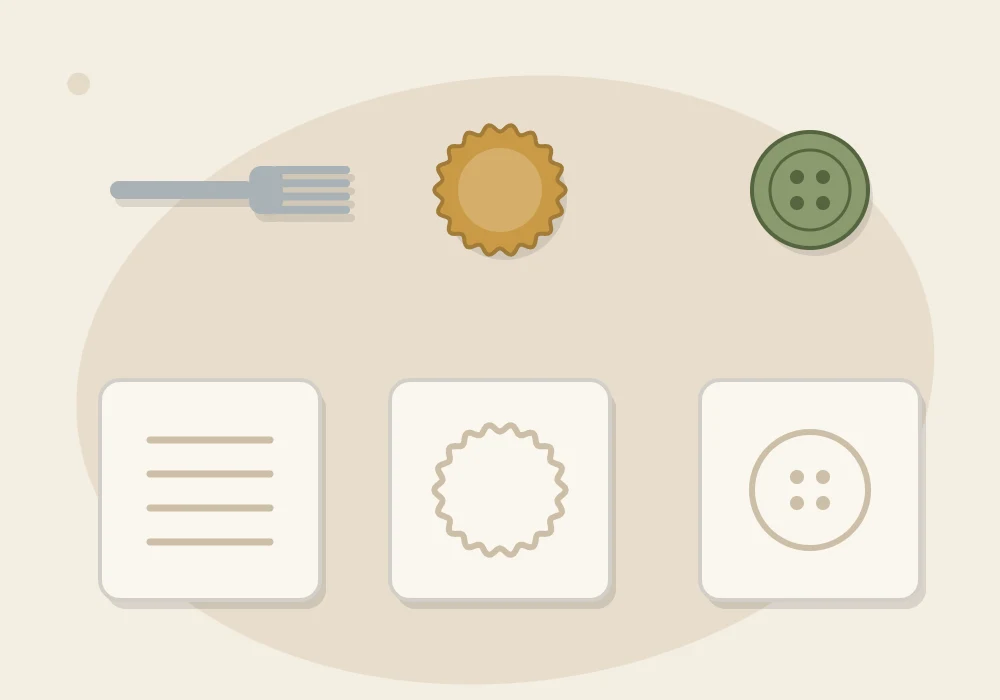
- Fork: press the tines flat for rows of parallel lines, or use the tips for dotted rows.
- Bottle caps: the open side stamps a ring; a ridged edge rolled along the clay makes a notched track.
- Pen caps and straws: small circles for scales, polka dots and flower centers.
- Buttons: pressed face down, they leave a circle with its holes as raised dots.
- Toothpick or skewer: the blunt end makes tiny dots; the side makes short dashes.
Press straight down and lift straight up. Repeating one simple mark in rows or rings often looks better than mixing many different stamps on one piece. Stick to plain shapes and your own patterns rather than objects with logos or lettering.
Carving Lines When the Clay Is Firm
Drawing into soft clay throws up ragged crumbs along each line. Wait until the piece is firm but not dry, cool to the touch and no longer sticky, then draw with a toothpick or needle tool. The lines come out cleaner and the piece does not bend under your hand.
Keep carved lines shallow, no more than about a third of the thickness, because deep grooves create thin spots where cracks can start. Leave the crumbs alone until the piece is completely dry, then brush them off with a soft, dry brush instead of rubbing them back into the surface.
Releasing Stuck Stamps with Cornstarch
If a stamp or fabric pulls the clay up with it, the clay is probably too wet or the stamp too detailed. A very light dusting of cornstarch acts as a release.
Tip
Dust the stamp, not the clay. Dip a soft brush in cornstarch, tap off the excess and brush the stamp lightly. Any powder left on the clay can be brushed away once the piece is dry.
Letting a freshly rolled slab sit uncovered for about 10 to 15 minutes also helps, since slightly firmer clay grips less. Avoid oil as a release; it can leave patches where paint does not take evenly.
Watch out
Deep texture thins the slab at the bottom of every mark. Dry textured pieces slowly at room temperature, turn flat ones over now and then, and expect that very deep impressions carry a higher risk of cracking.
How Paint Washes Bring Texture Out
Texture on plain white clay can be hard to see. A paint wash fixes that. Once the piece is fully dry, thin a little acrylic craft paint with water, brush it over the textured area so it runs into the low spots, then wipe the surface straight away with a soft cloth or a slightly damp sponge. Color stays in the recesses and the raised areas go back to nearly bare, so every vein and dot stands out.
A darker wash over pale clay gives the strongest contrast. You can also do the reverse: paint the whole piece a solid color, let it dry, and lightly drag a nearly dry brush of a paler color across the high points. Both methods, along with prep and sealing notes, are covered in the tutorial on how to paint air dry clay.
Frequently asked questions
Should I texture air dry clay before or after cutting out shapes?
Texture first for all-over patterns, because pressing spreads the clay and distorts shapes that are already cut. Add single stamps or borders after cutting, using light pressure.
Why is my stamp sticking to the clay?
The clay is likely too wet or the stamp has fine detail that grips. Let the slab firm up for a few minutes and dust the stamp lightly with cornstarch.
Can I add texture after the clay has dried?
Pressed textures need soft clay, so they cannot be added once the piece is dry. Fine lines are best carved at the firm, slightly damp stage.
How do I make the texture more visible?
Brush thinned acrylic craft paint over the dry piece and wipe the surface right away. The color stays in the recesses and makes the pattern stand out.